
Spot hazards now: walk your main routes slowly, mark bumps and dips over 1/4″, and photograph them with a ruler so you’ve got proof and priorities. Probe joints and edges for loose base or root heave, note pooling water or downspouts dumping nearby, and pick short fixes—sweep and polymeric sand, lift a paver and add compacted sand, or grind tiny lips—for quick safety. Fix drainage and base before major releveling; more tips follow.
Some Key Takeaways
- Inspect high‑traffic routes now, flagging rises or drops over 1/4 inch and photographing each spot with a ruler for records.
- Check drainage and downspouts, and correct slopes so water runs away from walkways to prevent winter erosion and freeze damage.
- Probe joints and bases for voids or root heave; looseness or easy rod penetration indicates a weak base needing repair.
- For minor settlement, consider mudjacking or releveling after fixing drainage; replace slabs with large cracks, exposed rebar, or >2–3 inch damage.
- Temporarily mark hazards and install low‑profile ramps or warning signs while planning permanent repairs before spring foot traffic increases.
Spot and Prioritize Trip Hazards on Your Walkway

Start by walking the route you and visitors use the most, moving slowly and looking closely for any places where the ground doesn’t feel even underfoot. Spot trouble where pavers gap, edges lift, or hairline cracks appear, since those uneven signs often mean base or Drainage issues. Focus first on high-traffic runs — driveway-to-door, front steps, mailbox and school paths — because fixing those cuts risk most, and you’ll sleep easier. Measure obvious rises with a straightedge or just note anything over about 1/4 inch, those are common trip hazards. Triage by severity: quick temporary patches or grinding for small shifts, pro leveling or replacement for larger or root-driven heaving. Take it step by step, progress beats perfect. Consider adding proper edging to help protect walkway borders and maintain long-term stability (proper edging).
How to Inspect Pavers, Concrete, and Stone for Unevenness
When you walk your path to check pavers, concrete, or stone, go slow and look for the little things that add up—gaps, raised edges, hairline cracks, or spots that sound hollow when you tap them—because those clues usually point to a problem under the surface like a washed‑out base, poor compaction, or tree roots lifting things. Start by testing joints and changes for uneven slabs of 1/4 inch or more, that small change is a real trip hazard, so you’ll want to mark it. Probe suspect areas with a screwdriver or probe rod, listen for hollow sounds, check around trees for root heave, and note where water pools. Drainage: make certain walkways slope away from buildings, and take photos so you can plan fixes without panic. Consider using durable concrete resurfacing products concrete resurfacers to refresh and stabilize worn or uneven walkways.
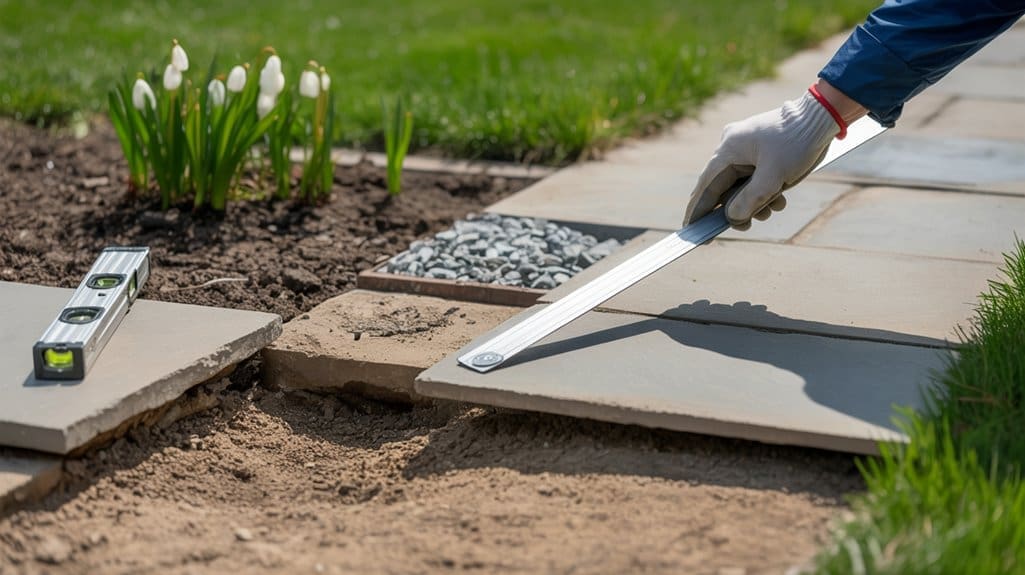
Measure and Map Settling: Document Heights, Cracks, and Gaps
You’ve already looked for gaps, raised edges, and hollow sounds, so now it’s time to measure what you found, so you can plan repairs that actually fix the problem instead of guessing. Start by running a 4–6 foot level or laser level across each section, noting vertical differences to the nearest 1/8 inch, flagging any Uneven Sidewalk drops over 1/4 inch as high priority. Walk the path, mark stakes every 3–5 feet, and draw a simple grid map, recording measurements, crack widths, and gap sizes between pavers. Check slope and drainage by measuring elevation change over distance, photograph each spot with a ruler and compass orientation, date it, and compile a prioritized list so you can tackle safety first. Progress over perfection. Consider adding simple drainage solutions like surface channels or channel drains to protect walkways from future settling and water damage, and learn more about drainage systems to decide which option suits your patio best.
Determine the Root Cause: Drainage, Poor Base, or Tree Roots?
Check the first thing you’ll notice is how water runs — if the path’s flat or funnels toward the house, that trapped water can soften the base and make things sink. Next, pry a small test hole or tap a few slabs to see if you’ve got compacted gravel under the pavers or just dirt and voids, because a weak base needs fixing, not just surface patching. And if you see raised edges near trees or cracked, lifted slabs, roots are often the culprit, so treat that differently than a drainage or base issue. Also consider whether the edging and joint materials are holding up — properly installed paver sand helps keep joints stable and prevents shifting.
Check Surface Water Flow
To figure out whether water is the real culprit behind that uneven walkway, start by watching how surface water behaves after a good pour or a heavy rain, because how it moves (or doesn’t) tells you a lot about the root cause. Heading: Watch the flow — pour a few gallons at the top, see if water flows away within 1–2 minutes or pools, because persistent pooling points to blocked drainage or poor slope. Step: inspect edges and downspouts, note if gutters dump close to the path or soil slopes toward it, those redirect runoff. Peek for signs of roots lifting edges, and use a level to confirm consistent slope. If water doesn’t move, you’ve found your clue. Progress, not perfection. Consider using a leveling compound to repair minor depressions and restore an even surface.
Inspect Base And Bedding
Start by digging a small test pit under the low spot — about 4–6 inches for a paver, a bit deeper (up to 9 inches) where people or cars put more weight — and you’ll quickly see whether you’re dealing with soft soil, a missing gravel base, or a void. Heading: Inspect Base And Bedding. When you excavate a 4–6 inch test pit, look for 3–4 inches of compacted crushed stone or gravel under the slab; if you find dirt or organic fill, that’s your problem. Check for standing water or a flat slope, which will wash base material over time. Do a compaction test with a screwdriver or rod — easy penetration means it wasn’t compacted well. Small fixes matter. For longer-lasting results, consider installing a proper paver base and compacting it thoroughly before rehabbing the surface.
Look For Tree Rooting
You’ve already pulled a test pit and ruled out soft fill or a missing base, so now take a close look for tree roots as the real culprit. Look for raised sections near trees, narrow uplifts or bowed pavers within a few feet of the trunk, that tell you root heave is at work. Lift a slab or edge a paver gently, check for thickened roots larger than an inch within a foot of the surface. Use a straightedge to compare long sagging runs to sharp, local bumps—sharp means roots, long means drainage or base. Note timing too: spring growth, especially from maples, oaks, willows, often worsens heave. You’re not alone in this; small fixes or managed pruning can restore safe, steady paths. Consider adding umbrella lights to brighten nearby patios while you repair pathways.
Quick DIY Fixes for Small Lifts and Loose Pavers
If a few pavers are wobbling or a seam has opened up by less than half an inch, you can often fix it yourself without calling a pro, and that small bit of work will make walking safer right away. Quick fixes calm uneven surfaces and keep your path feeling cared for. First, sweep joints clean and brush polymeric sand into gaps, tamping it down, then mist per instructions to lock loose pavers in place. If a paver sank slightly, lift it, add or remove thin layers of compacted concrete sand, and re-seat on level base. For edge pieces, use a pry bar, check restraints, refill with compacted crushed stone. Grind small raised edges if needed, protect yourself, and mark hazards while you work. For longer-lasting results, consider using polymeric sand to stabilize joints and reduce future shifting.
When to Relevel vs. Replace: Choosing the Right Repair Method
When you’re deciding whether to relevel or replace a slab, start by checking how bad the damage is and what’s under it — minor settles or intact slabs usually mean releveling, while big cracks, crumbling concrete, or more than about 2 inches of drop usually call for replacement. Remember releveling is cheaper and fast, often same-day, but won’t stop problems if the base or drainage is shot or roots keep growing, so inspect and fix those causes too. Prioritize the spots folks use most, aim to restore a gentle slope to keep water moving, and don’t worry about perfection — steady repairs beat one big rush. For homeowners, using quality crack filler products can help keep repaired areas looking neat and last longer.
When To Relevel
Because settled slabs don’t always mean the whole walkway is doomed, you can often get away with releveling instead of tearing everything out, especially if the slabs are mostly intact and the misalignment is modest. When to relevel matters: if you spot gaps from soil erosion, small drops under about 2–3 inches, limited cracking, and no major root heave, you’re a good candidate. Releveling is quick, cost-effective, and can make concrete walkways usable the same day, so you’ll feel better fast. Check causes first — poor drainage or loose base will bring problems back. If differences are minor, consider grinding for tiny trips, or patching very small low spots, but releveling is usually the sensible, community-minded choice. Sealing pavers after releveling can help protect against staining and erosion, contributing to longer-lasting pathways and improved patio maintenance.
When To Replace
Although releveling can save time and money, you’ll want to pick replacement when the damage goes deeper than a quick lift and patch can fix, because swapping out a slab gives you a real chance to fix the root problems, not just the symptoms. When to replace? If cracks are everywhere, concrete’s crumbling, rebar shows, or damage covers more than about a third of the panel, replace the slab so you can rebuild the base, correct slope and drainage, and stop ongoing problems. Favor full replacement when severe soil erosion, persistent root heave, or repeated freeze-thaw cycles keep undoing fixes. It’s more work up front, but it’s the step that protects your path long-term. Progress matters.
Proper Foundation Prep for Lasting Repairs (Excavation and Base)
Excavation and a solid base are the quiet heroes of any lasting walkway repair, so take your time up front and you’ll save headaches later; you’ve got to dig down to a consistent depth — usually 4–6 inches for foot traffic (go deeper, up to 9 inches, where cars or heavy loads will sit) — so the final surface lays true without you having to overfill or guess. Heading in: excavate the walkway to uniform depth, keeping a slight slope away from structures so water runs off, not under your work. Pack 3–4 inches of clean crushed stone into a compacted base, add a smooth 1‑inch sand bed, then install edge restraints right after laying, and you’ll keep everything where it belongs. Progress beats perfect.
Step-by-Step: Rebuilding a Sinking Paver Section Correctly
Excavate the sinking section first, pulling up the pavers and old bedding so you’ve got a clean, even hole to work with. Rebuild the base with properly graded crushed stone, compact it tight, then screed a thin sand bed so the pavers sit true. Reset the pavers with solid edge restraints, lock them in with a plate compactor, and finish by sweeping in polymeric sand and misting to seal the joints — progress beats perfection.
Excavate The Sinking Section
Dig in and take your time—this is the point where you’ll set the whole repair up to last, so doing it right now saves headaches later.
Excavate the sinking paver section to a uniform depth, remove pavers and old bedding down to a stable subgrade, and check the subgrade slope so water runs away from your house, aiming for about 1/8–1/4 inch per foot. You’ll feel better knowing drainage’s sorted before you go further. Remove soft spots, make the surface even, and clear roots or debris that’ll compromise the compacted base. If the subgrade’s uneven, correct it now, compact gently, and recheck slope. It’s okay if it takes longer than you thought — solid prep keeps the repair standing, and you’re doing this right.
Rebuild Proper Gravel Base
Now you’re ready to rebuild the gravel base, and this is where the repair really takes shape, so go slow and be exact—your patience here pays off. Rebuild Proper Gravel Base: start with proper preparation, you’ve excavated to the right depth, so remove any debris, then lay 3–4 inches of clean crushed stone, spread evenly. Compact in passes with a plate compactor until it’s dense and steady, that firmness prevents future settling and keeps pavers level. Add a screeded inch of washed concrete sand on top for a uniform bedding layer, don’t compact the sand. Keep the slope for water runoff, check levels as you go, and remember, small adjustments now save headaches later. You’ve got this.
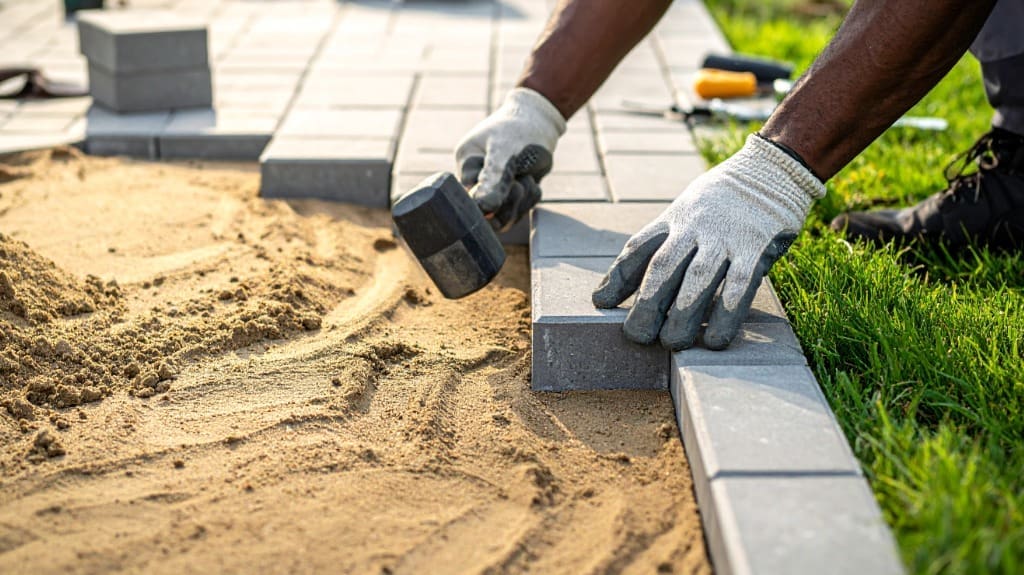
Reinstall And Joint Fill
Reinstalling the pavers is the part where you start to see your hard work pay off, so take it slow and keep things tight—literally. Now, set the edge restraints and lay a screeded inch of washed concrete sand over your compacted sub-base, keeping that gentle slope for drainage, then reinstall pavers to the original pattern, fitting them tightly, tapping with a rubber mallet until they sit flush. Next, sweep polymeric sand into the joints, filling them completely, you’ll want solid joint fill to lock everything together. Run the plate compactor over a protective mat to seat the pavers and bond the sand, mist the joints per instructions, avoid heavy watering for 24–48 hours, and recheck after a week, topping up as needed. Progress over perfection.
Material and Joint Choices That Prevent Future Tripping Hazards
Choosing the right materials and joint methods will keep your path steady for years, so you don’t end up constantly fixing trip hazards. Material choices matter: use a compacted crushed-stone base with a 1–2 inch bedding of washed concrete sand, and rely on polymeric sand in paver joints, compacted and misted to lock things in and cut weed growth. For mortar joints on stone or brick, pick flexible polymer-modified mortar and plan to refresh it every few years in exposed spots. Pay attention to joint widths—narrow for precision pavers, wider for natural stone—so pieces don’t shift. Don’t skimp on edge restraints, they stop spreading under traffic. Small choices now prevent big fixes later. Progress over perfection.
Planning for Drainage and Landscape Integration to Stop Re-Sinking
If you want your path to stay put instead of sinking after the first heavy rain, plan for drainage and landscape ties from the start—controlling where water goes and keeping garden beds from washing into the base will save you headaches later. Heading: plan the grade and base. You’ll set a consistent slope of at least 1% away from structures, excavate 4–6 inches, and build a 3–4 inch compacted crushed-stone base with a 1-inch sand layer, which prevents water from undermining the footing. Heading: edge and junction. Add edge restraints, a slight cross-slope, drain outlets or gravel trenches, and a 6–12 inch compacted buffer to keep mulch from washing in. Small steps, big payoff—preventing future re-sinking.
When to Hire a Professional and What to Ask During the Inspection
When your walkway starts to feel like it’s working against you—trip hazards at joints, several slabs sloping odd ways, or cracks that look wider than a finger—you should call in a pro, because those signs usually mean something’s wrong below the surface, not just cosmetically. You’ll know you need attention when unevenness exceeds a quarter inch, cracks go beyond half an inch, or multiple slabs settle or heave. Ask whether they’ll do a full diagnostic—drainage, soil, roots—and insist on a written report that explains root causes and structural integrity, not just patchwork. Confirm recommended fixes, lifespans, prep and compaction standards, itemized costs, licensing, insurance, references, and a timeline that avoids spring thaw.
Some Questions Answered
How to Fix an Uneven Concrete Walkway?
Fix it by lifting, grinding, patching, or replacing depending on damage. Start by inspecting causes, then use concrete leveling (polyjacking) for settled slabs, grind minor highs, or patch small lows with overlay. For full replacement, compact the base, add edge restraints, reinforcement, proper drainage, and pour new concrete, you can even add decorative stamping for a nicer finish. Sweep joints, brush in polymeric sand, and know progress beats perfect.
How to Make a Walkway on a Slight Slope?
You’ll grade slope carefully, starting by excavating and grading the subbase to 1–2% so water runs off, then add and compact crushed stone, lay a 1-inch sand bed, and set pavers, checking levels as you go. Retaining edges keep everything locked in, and drainage planning prevents puddles and freeze-thaw damage. Take your time, ask for help if needed, and remember progress over perfection — you’ve got this.
How to Raise a Sunken Section of a Sidewalk?
Pick a plate lifting or mud jack method, or use poly urethane (polyjacking), to raise the sunken slab, and start by checking drains and roots so it won’t sink again. You can grind a small lip or patch if it’s under about 1.5 inches, but full lifting fixes voids longer-term. Call a pro for larger or risky spots, stay involved, and remember, progress beats perfection—one level step at a time.
What Is the Cheapest Way to Build a Walkway?
They say, “A stitch in time saves nine.” The cheapest way is crushed gravel, you can DIY it fast, save money, and still get a solid path. Start by planning a straight line, dig and compact a base, lay landscape fabric, add gravel, tamp it, and edge it with boardwalk frames or reclaimed wood so it looks tidy. Drop in stepping stones if you want stability and style. Progress beats perfection—start small, you’ve got this.


